Front Brake removal/refurbish
post 94 brembo equipped Esprits
by Jonathan Edwards
The later Brembo equipped Esprits are pretty easy to work on as you can see from this guide, removing and replacing the whole braking system should not take long at all depending on how the system has been maintained in the past.
You will obviously need to jack the car and remove the wheel which is explained elsewhere on this site. Always consider safety 1st and think about what you are doing, don't get under the car un-necessarily and always support the vehicle in the correct areas. Brake dust is nasty stuff so handle used parts with care, do not blow brake dust all over the place with an air line and so on.
You will need the following parts:
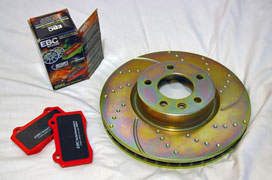
new pads
new disks
new disk fitting screws.
I'd fully recommend getting some copper grease too and some brake fluid if you need to bleed the calipers.You will need the following tools:
jack
wheel nut spinne
pin punch
hammer
Selection of small spanners
Allen key 10mm
and a T-27 Torx bit if you fancy going the whole 9yards and stripping it all down
Removal
Removing the Pads
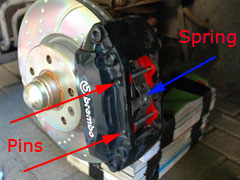
You will need to punch out the 2 retaining pins in the back of the caliper that hold the spring and the pads in place, use an appropriately sized pin punch and a hammer to carefully knock them out. Once the pins and the spring are out of the way the pads should be free enough to pull them back out of the caliper away from the disk. If this cannot be done you have either got damaged / swollen shim plates (see below) or there is an raised edge on the disks themselves preventing the pads from moving outside the disk area, this will need to be removed using a file.
The pads should slide in and out of the caliper with very little to no resistance. Inspect the caliper for any fluid leaks and excessive brake dust, it wont hurt to clean in briefly although if you are not replacing the disk it's important to ensure the frictional surface is spotless after cleaning. Important – if you are putting these original pads back in, it is important to get them round the right way when re-fitting or they will wear un-evenly. Mark the pads so you know which one refers to which side of the disk.
Removing the disk / caliper
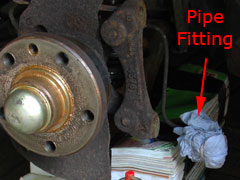
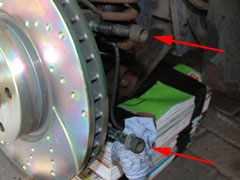
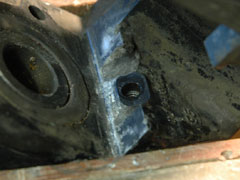
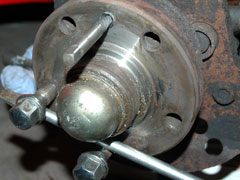
I would tend to take the caliper off if you are changing the disk, the reason being is that the caliper is supplied with rigid hydraulic pipe, in the action of taking the disk off there is a possibility that this pipe could be bent and damaged when you move the caliper out of the way. It is much better practice and safer to remove the pipe where it meets the caliper so that the unit can be taken off, the downside is that the brakes will have to be bled when re-fitting.Firstly the pads will have to be removed (see above) and then remove the hydraulic fitting to the caliper which is located on the inside at the bottom, undo it using a 11mm spanner. Brake fluid might leak from this pipe so be ready to catch any fluid. The image below shows the near side brake caliper removed with a piece of absorbent paper over the end of the brake pipe fitting.
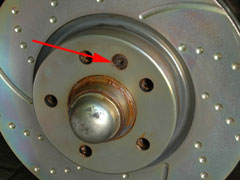
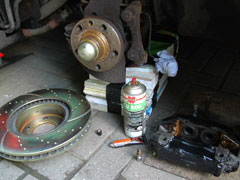
Next you will need a 10mm allen key to undo the 2 cap head bolts (arrowed centre with the caliper already removed) holding the caliper onto the hub bracket, the caliper is now free and can be taken off the car.
Finally the disk is held on by a small cap head bolt (arrowed right) which is in-between 2 of the wheel nut holes in the disk, this needs to be removed in order to take the disk off. On a few cases I have heard this bolt can become seized, the 1st one I did was fine but the other side was a nightmare - see below on how to take this bolt out if it seizes.
Refurbishing the Caliper
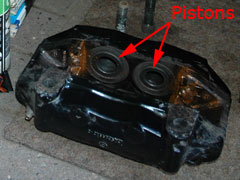
Before working on the caliper it is worth draining the hydraulic fluid from inside it, do this by pushing the pistons / pots back into the body of the unit, this also helps bleeding (see below). Be very careful as oil can come out at force so direct the hole where the fitting was which was taken off into a suitable container - remember brake fluid hates paintwork so keep this well away from your car's bodywork.
Once all the pistons fully back the caliper can be cleaned to remove any dirt and brake dust. Apart from it's general condition the other thing to note is the shim plates or pad runners on each side of the caliper (4 on each), on my car there was some corrosion on the caliper itself and some damage caused by who ever changed the last pad set to the shims - this had caused damage and warping to the plates so they had to be taken off, hammered on an anvil and dressed back into shape.
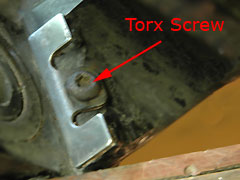
To do this you need a Torx bit and a right angle driver to get at the retaining screw, the Torx head is likely to be full of brake dust and dirt so it might need cleaning out before hand - be sure to take this step carefully as a rounded off screw in this position will be nigh on impossible to take off without splitting the caliper which is highly undesirable, the screws also have thread lock on them which makes them pretty hard to turn.
The corrosion under the shim (seen on the right as white residue) seems to have lifted it fractionally which resulted in a jammed pad and a warped disk in my case !
Upon piecing the components back together do a test run with a brake pad to ensure the pad slides in and out of the caliper with little to no resistance, ensure the mating faces of the shim plate and the caliper body are generously coated in copper grease (to prevent further corrosion) and re-assemble the shims using thread lock on the screw as before, this screw should only be nipped up as the thread lock will stop if from working loose, do it up too tight and getting it off again will be very hard.
Replacing the disk
The thing to remember about replacing the disk is keeping things clean ! Firstly I always rub the wheel hub with some fine emery paper to remove dirt and corrosion on the mating faces, this cuts down on the possibility of the hub and the disk mating un-evenly together. The hub should be coated in copper grease to prevent corrosion occurring between the disk and the hub itself, finally it is worth checking and cleaning the mating faces on disk before fitting.

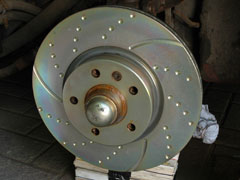
Slide the disk into place and replace the cap head retaining screw, again use copper grease on the threads here to ensure in future it will come off without seizing in place. Clean the frictional surface of the disk, front and back, with a suitable solvent like white spirit to remove any dirt and grease.
Before fitting the caliper I clean the mating faces between this part and the hub using emery paper, copper grease between the two is also recommended. Replacing the caliper is the reverse of removal except I would fit the hydraulic brake line pipe first to the caliper before offering it up to the hub, this reduces the risk of it bending when trying to align it. Once the caliper is in place use copper grease on the 2 large bolts that secure it to the hub and tighten them up.
Once again ensure the disk is clean in-case any dirt has got onto it whilst fitting the caliper, now you can fit the pads. Now you are ready to re-fit the caliper and connect the hydraulic fitting.
Replacing the pads
I use copper grease (anyone sense a repeating theme here ?) on the parts that are in contact with the caliper, this means the end which make contact with the shim plates and the back of the pad which is in contact with the pistons. All this use of copper grease ensures when you do the job again the parts should just come off as if they were brand new and make your life much easier - you should be able to change a well maintained braking system in well under 30mins. Refitting is simply the reverse of removal, being new they should slide in with little to no effort.Fit the spring and retaining pins back into the assembly, knock the pins from the back, ensure they are in fully using an appropriate sized pin punch.
Bleeding the caliper
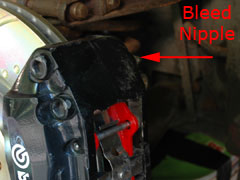
If you disconnected the brake line you must bleed the caliper of air, to do this use the 11mm spanner to crack open the bleed nipple at the top of the caliper. Put a bit of pipe onto the nipple and direct it into a container, the idea here is to press the brake pedal repeatedly until all the air is expelled from the system and there is only neat oil flowing out of the nipple. To do this you need 2 people - one to push the pedal in and one to control the bleeding.
When the air is gone from the oil keep the pedal pressed down and re-tighten the bleed nipple. When you lift up the brake pedal should feel solid again and you should feel the pads grip the disk. Remember to top up / check the brake fluid reservoir before driving the car ! I found the Esprit very easy to bleed and only required 2-3 pushes of the pedal.
A final note
A few people I have spoke to who have replaced disks complained about the disk retaining screw (as seen above). This screw is simply there to stop the disk from rotating on the hub when you're fitting the wheel and the keep the disk straight when changing the pads. When it seizes however it is a pain and you must be very careful taking it off - here's how I done mine.
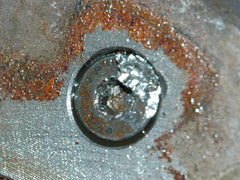
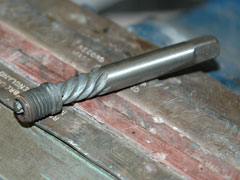
On the left is the screw after I had tried pretty much every conventional way to get it off. I drilled the head off very carefully using a 10mm drill bit, I was wary not to go in too far and hit the lip on the disk itself. Through the centre I ran a 6mm drill and used a stud extractor to gently ease the screw out. Replacements are cheap but it is not a common thread size so it's best giving someone like SJ Sportscars a ring to get a replacement.
All that's left to do now is refit the wheel, test the system out, and bed the components in.
Verdict
This guide should be very useful for Esprit owners. Brakes wear out and need replacing. Doing it yourself can save you money and give you a warm feeling inside (after the skin has grown back on your knuckles). Remember that brakes are an importmant safety feature on your car. So if in doubt, get help or get a professional to do it. Hopefully at least a few owners will save money due to this guide. Which is one of the primary reasons for LEW.
This mod was performed by Jonathan Edwards on his 1998 Esprit GT3.
If you have any comments, feel free to e-mail us at admin@lotusespritworld.com
![]()
User Comments
The article states:
"Once the caliper is in place use copper grease on the 2 large bolts that secure it to the hub and tighten them up".Firstly, the article makes no mention whatsoever about torquing the caliper (or any) bolts. The specifications on my car (1995 USA S4s) note that 65 pound-feet is the proper setting, but that should be verified for any individual's year and model. Further, I NEVER apply any lubricant whatsoever to the threads of any fittings which which must be torqued...doing so changes the coefficient of friction and hence the published setttings, and then you become a test-pilot, since no one in the world knows what the correct torque should be. I do, however, thoroughly clean the mounting bolts using a wire brush, and examine and, if necessary, run a tap through the other piece. The torque values determined by engineers are based on clean, dry threads. Modifying this in any way is fraught with peril in most things, but how would you feel pushing on the binders with the outcome not completely assured?
Secondly, the article addresses bleeding the calipers:
"Bleeding the caliper
If you disconnected the brake line you must bleed the caliper of air, to do this use the 11mm spanner to crack open the bleed nipple at the top of the caliper. Put a bit of pipe onto the nipple and direct it into a container, the idea here is to press the brake pedal repeatedly until all the air is expelled from the system and there is only neat oil flowing out of the nipple. To do this you need 2 people - one to push the pedal in and one to control the bleeding.".My comment about this statement is that the bleeding procedure for those of us with Delco Moraine ABS IIIA systems is quite different from normal, and this point should be mentioned.. LEW has a maintenance piece (with 17 separate tasks) to bleed brakes for this system which notes the time to complete at one to two hours, and in my opinion, having done this, is completely accurate. And the procedure must be completely followed or the system cannot be bled properly.
I would like to thank this contributor, and all who contribute to the LEW forum, for the help I have found in maintaining their Lotus.
and here is an explanation of the effect of lubricating bolts and nuts, the threads of which which will be over-streched.
http://www.zerofast.com/torque.htm
I once used Never-Seize on the bolts fixing a Europa's trailing arms to the aluminum hub carrier, ruining most of the of the threads in the hub carrier...to fix it, I had to repair with heli-coil inserts into each of the hub carrier holes, 16 of them. lesson painfully learned.
Regards,
Steve Rineer
Littiz, PA
USA
|
|