

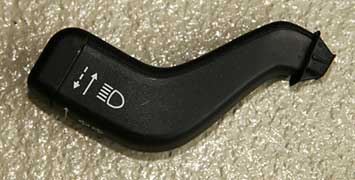
Esprit Indicator Stalks
Replacements for GM Equip'd Esprits 1993-2004
I’m a bit of a fan of alloy interior trim upgrades for my 2002 V8, as I found the original all black interior was dark, felt a little claustrophobic, and didn’t really suit the more modern exterior. So, when offered the opportunity to try a new set of alloy indicator/wiper stalks, I was happy to accept!
As the kit I was given was just a trial, it only contained the two alloy indicator/wiper stalks, and nothing else… not even instructions! So here's the instructions! This will hopefully be available to purchase in the E-shop in the very near future. So look out for them.
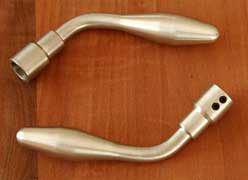
Initial impressions were that the stalks were well made, of good quality and with an excellent look and finish. So time to see how easy they are to fit and what they look like in the interior of the Esprit.
Anything shown below is only a guide. You take the work on at your own risk and Lotus Esprit World takes no liability for anything you do on your own Esprit.
Installation
The installation was easy enough, and should only require around 30 – 45 minutes to complete.
|
You will need the following parts: Two alloy stalks |
You will need the following tools: Cross-head
screwdriver |
This install guide is split into the following simple steps:
Step 1 – Remove the cover from the steering column switches
Step 2 – Remove the old indicator and wiper stalks
Step 3 – Fit the new alloy stalks
Step 4 – Replace the coversDon’t get confused by the photo’s – remember that my car is left hand drive!
Step 1 – Remove the cover from the steering column switches
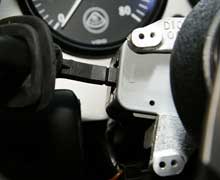
The switch gear on the steering column (indicators and wipers) are covered with a two piece plastic / leather coated surround. The upper piece is held in place with four screws, and the lower piece with three.
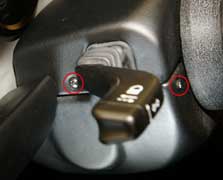
To remove the cover, start by undoing the four screws holding the upper piece in place (two on the left side, two on the right, see picture above left). The upper cover can then be removed by simple lifting. Next remove the three screws holding the lower cover in place (see picture above right). Again, the lower cover can then be removed by simple pulling. It may require a little careful manoeuvring to get around the ignition switch assembly.
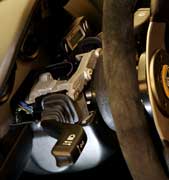
Step 2 - Remove the old indicator and wiper stalks

Peel back the rubber boot to reveal the plastic indicator stalk underneath. Now, for the sad bit – in order to remove the old stalks, there is no choice but to cut through them with a saw! I was a bit reluctant to do this, as I generally don’t like any Esprit modification that cannot easily be undone. However, in this case I decided that the old stalks could still be reattached (super-glued and reinforced), and this would not be visible, as the repair would be hidden by the rubber boot. If you’re not happy cutting through the original stalks, don’t do this modification!
If you do decide to proceed, the original stalk should be cut leaving as much straight plastic remaining as possible, so in other words, cut it as close to the bend / flange as you can. This can be seen in the pictures above. Be very careful not to damage the dashboard, steering column, or any of the exposed wiring & switches
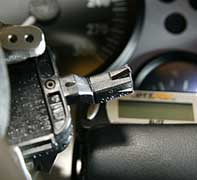
Above left shows the indicator switch after it has been removed. The cutting point can be seen clearly. Notice the flange near the cutting point. This is used to hold the rubber boot in position.
Once the indicator has been successfully removed, the procedure should be repeated to remove the wiper stalk. The picture above right shows what’s left of the wiper stalk after cutting. It’s important to note that the wiper stalk is slightly shorter before the bend / flange than the indicator stalk is. Therefore, the cut needs to be made very close to the flange. If in doubt about the correct cutting point, hold up the new alloy stalk to get a feel for how much of the wiper stalk needs to remain for attachment. Also notice in the picture above right that, as the cut was made very close to the flange, the remaining stalk has some small triangular plastic pieces sticking out at right angles to the stalk itself. If left in place, these will make the whole stalk too wide for the new alloy stalk to slide over. Therefore, remove them by simply snapping them off with some thin nosed pliers.
Step 3 – Fit the new alloy stalks
Fitting the new stalks is extremely easy! Simply slide them over the stubs remaining from the old stalks, and tighten the two alan screws. Just be careful – make sure that the new stalks are fitted and rotated so that they bend towards the steering wheel !!
Once the alloy stalks are fitted, slide the rubber boots from the old stalks over the new alloy ones. Again, be careful to rotate the boots so that their shape follows the angle of the alloy stalks.


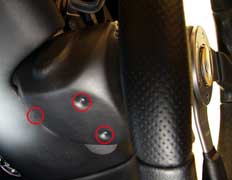
Step 4 – Replace the covers
Refit the lower cover by sliding it into position (be careful around the ignition switch), and inserting the three screws. Next, refit the top cover and insert the four securing screws. It can sometimes be a little fiddly to get all holes lined up, but hang in there, it does go back together!


Verdict
I have to admit, I was a bit apprehensive on this one, as I wasn’t sure how well the new alloy stalks would suit the Esprit interior. I don’t mind tarting things up a bit, but don’t want to go over the top. I was even more concerned when I found that I had to actually hack off the old stalks to do the installation.
However, now that the job is complete, I’m pretty happy with the way they look. They fit well with the (already alloy flavored) interior, and also feel really good to use. There is a feeling of solidity and quality. Overall, I like them!
Price & Ordering
Polished finish £39.99 Satin finish £35.00 Includes P&P in UK Available at the LEW E-Shop
Discount available for ClubLEW Members
This mod was performed by Rob Stansfield on his 2002 V8
If you have any comments, feel free to e-mail LEW at admin@lotusespritworld.com
Hi LEW,
Ordered the stalks on-line on Wednesday morning, they came the next day –
great service. They were easy to fit and look good.
Tip:- Before securing the top column cover back on, hold it in place and
make sure that the indicator will stay on in both directions. When I fitted
them, the gaitor would not allow the stalk to stay in the "turn right" position.
I repositioned the gaitor so that it was trapped along its second line of
the concertina - this allowed the stalk to operate correctly in both directions
and also exposed a little more of the stalk – see photo below.

Also, it is not necessary to remove the lower column cover.
Best regards,
Paul
|
|