Manifold Install
Fitting a SJ Stainless Manifold to a Giugiaro Esprit
by Angus Ironside
This manifold is one of several that are available for the S3 Normally Aspirated (NA). The original exhaust rusts and after a while one or all parts of it will need some attention and probably replacing. The original exhaust comes in the four sections, the manifold, the downpipe, and the primary and secondary silencers. I already had a stainless steel silencers so just need the SJ manifold and downpipe that comes with it.
This ‘How To’ will focus on how to fit the SJ Sportscars stainless steel manifold and downpipe (SJ Part no. SJ085S0004) to an 1982 S3 NA. (And a few words about how to remove the old iron manifold on an S3 NA!) The total cost to me was about £400ish but that included a couple of new tools. It took me weeks to do because of several problems I encountered but if all goes to plan then it could probably be done in an afternoon.
Thanks are due to Geoff at Esprit Engineering who offered lots of helpful advice about removing the old manifold, and to those who offered advice on LEF.
Time required – This depends on the state of your exhaust… if it has been on your car for years then allow a few days to get the old one off. Personally I spent weeks chiselling the old nuts off which I have been told is quite common - that said I was working only on the occasional evening. Once the old exhaust is off then it will only take about 3 to four hours, if that to fit the new one.
|
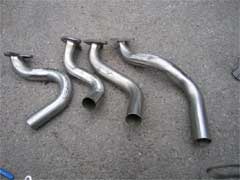
You will need the following parts: • 1 x SJ Sportscars stainless
steel exhaust manifold (comes with downpipe) (SJ Part number: SJ085S0004) |
You will need the following tools: • Stubby and normal spanner – 13mm, 10mm,
and a 1⁄4” for the old nuts |
Removing the old manifold
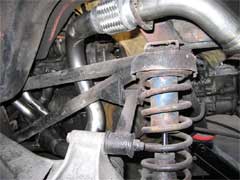
I have talked to people who have told me that it is essential to remove the engine to take off the old manifold. For an S3 NA don’t believe a word of it. It is by no means easy to get access to the nuts but it is completely possible. If you find yourself lying under your car wondering how you can get to a nut or despairing because it does not seem to be coming off – I can empathise. There is no easy fix aside from determination and time.Jack up the rear of the car and place the car on axle stands – make sure the car is stable and well supported. Remove the rear passenger side wheel to allow access to the exhaust manifold and downpipe. You will immediately see the downpipe from the manifold arching up and over the suspension and joining onto the smaller silencer.
Before starting anything I strongly suggest you cover all nuts with a generous spray of Liquid Wrench or something similar – even spray the nuts on the old manifold that you will not get to for another fifteen minutes or so. It is good to get into a routine of spraying all of the nuts you will be removing every twenty minute or so – it can only help. (If you have the time to soak them over night even better!)
Remove the nuts and bolts securing the downpipe to the silencer and throw them away. The likelihood is that the pipe will not automatically come away, leave it in place for the moment. Next tackle the nuts securing the down pipe to the exhaust manifold. There are 3 nuts that will require a 13mm spanner. Once all of the nuts are off the pipe will be stuck to the manifold from years of heat and the gasket will not be helping matters. I took a plastic hammer to the downpipe which freed it pretty easily from the manifold studs and a few knocks on the other joint cracked the hardened exhaust paste allowing the pipe to fall away.
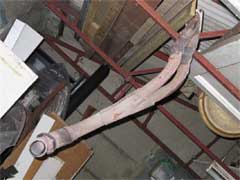
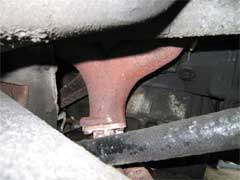
Old downpipe
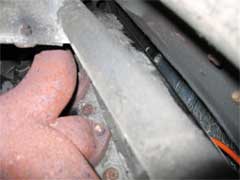
Now that the downpipe is off you can now start to really see the layout of the old manifold and why it is such an awkward job to remove it. The location of the nuts makes it very difficult to get much leverage on some of them, especially those that are positioned near the engine mount.
My advice is to start with the nuts you can’t see – if you undo all of the easy ones first then that will put even more pressure on the difficult ones making them even harder to undo.
If you find that all of the nuts on your manifold come off easily then lucky you and you can move onto the stud removal and head preparation stage. If however, the nuts are being tricky to unscrew then read on. There might well be a few nuts that you think will never come off with a spanner – you are probably right. I came across 6 on mine that I had to literally chisel off. This is where the long shafted flat head screwdriver comes into its own, sharpen the end with a grinder and get to work using a hammer and lots of swearing… I also made use of a Dremmel multi-tool and the small grinding discs that it came with – very helpful but they will only reach some of the nuts. The other useful tool was a flexible drill extension that allowed me to get the Dremmel cutting discs to a few more nuts and also allowed me to drill a couple of the nuts off. Whatever method you use it is not quick. N.B. Try not to damage the stud too much when taking the nuts off – although you will be replacing the studs and nuts a lot of the stud removers require a good length of stud to work with – don’t worry about the threads though.
After you have all of the nuts off then wiggle the old manifold free – use a breaker bar against the chassis to lever it off if you need but do not be tempted to stick something between the head and manifold as this may affect the flat surface of the head which may cause problems down the road.
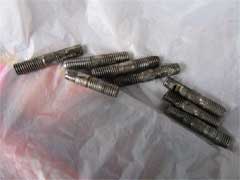
With the manifold off you will now need to remove all of the studs. Some people choose to leave them in place because it is too much hassle and the threads are ok. My view is that if you have taken the time to remove your old manifold you may as well replace the studs as well – removing the studs will also make cleaning the surface easier too.
Most of your studs will probably unscrew without too many problems – a pair of mole grips will be invaluable. For those studs that just won’t move using conventional tools then you will have to invest in a stud remover. There are numerous types available and they range in cost from £14 up to £lots… I bought four different types before I found one that worked on the most stubborn stud. That said, I found them all useful for different things. The best one was the cheapest for me (£3.50 Draper tool off Ebay)! If you use a breaker bar and some extension bars to reach the stud removal tool then you will make easy work of it.Old studs
A couple of the most useful stud extractors:
A draper stud extractor that dealt with the worst of them:
A Clarke set that proved more useful for putting the studs back into the head.
With all of the studs removed you can now clean the surface of the head properly. Although you will be using gaskets between the new manifold pipes and the head it is still important to make sure that the head is as clean as possible. Carefully scrape off the old gasket material and to finish the job I used a wire brush attachment on a small air drill which did a perfect job of taking off all the old crap. As Steve at SJ mentioned, it is important to ensure that the head is flat – the heat and crud build-up etc. occasionally results in a less than flat surface. I used the edge of a metal ruler and it worked well.
Cleaned head
Fitting the new manifold
Apply copper grease to your new studs and screw them into the head – I used a Clarke 8mm stud extractor for this which prevented damage to the threads. They should screw in all the way to the flat section on the stud.
Next position your new gaskets over the studs – if you look at the gaskets you will see that one side is slightly rounded on the edges – some people have said that this should face the head and in the absence of any other information this is how I fitted mine. In reality it shouldn’t make much difference if you have cleaned the head surface properly.
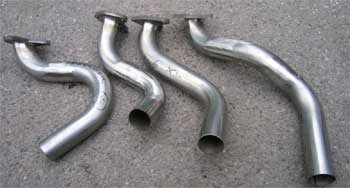
You are now ready to fit the manifold pipes. Firstly do a dry run and number the pipes in order from the one furthest towards the front of the car to the one that is at the back. Also write the numbers on the downpipe connectors to make it as easy as possible. I also suggest you slide the pipes into the corresponding downpipe connectors and mark on the manifold pipes how far in they need to go to clear the cuts in the downpipe connectors (it will become clear when you look at the pipe).
Start by fitting the pipe closet to the front of the engine, do not tighten the bolts more than a few turns each on any of the pipes you fit just yet – they should be jangling around. Then fit the second pipe and then very loosely fit the next one to allow you to fit the last pipe which will otherwise not fit on.
With the pipes all in place and rattling around, unscrew the downpipe connectors and do a dry run fitting it to the manifold pipes. In a perfect world they would all slide on perfectly but it might be the case that you will need to loosen some of the manifold pipes even more to allow the pipes to clear the chassis and fit in the downpipe. I removed the small silencer to give me more space to work with.With everything fitting pull the downpipe off and apply liberal amounts of exhaust sealing paste to the inside of the downpipe connectors. Work quite quickly to avoid the paste drying out before you have fitted it. Once you are happy that the downpipe is on properly, tighten the manifold nuts. After ensuring the downpipe has not moved tighten the fastenings with a 10mm socket/spanner.
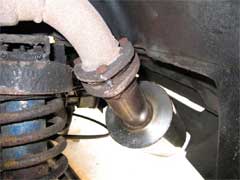
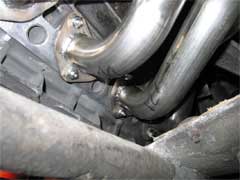
Manifold to downpipe joint – note the exhaust paste that has been squeezed out of the joint.
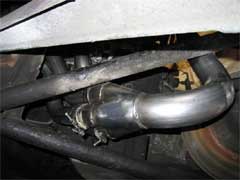
Just like the old downpipe it curves around the top of the suspension to meet the silencer.
Next clean up the joint on the small silencer with a wire brush/drill attachment and apply more exhaust paste, clamp the downpipe to the silencer and tighten the nutsThat is hopefully it! Remember to start the car and allow it to idle for 15 minutes so that the exhaust paste hardens and cures – this will also allow you to spot any leaks before you put the wheel back on. If you do find a leak just go back and repeat any of the above processes – the most difficult is connecting the downpipe to the manifold pipes so the leak is likely to occur there if anywhere.
Verdict
A great mod that will save you money, weight, and it will look good, sound good, and allow you to fix it in the future if needed – stainless can be welded with relative ease compared to the old iron manifold! Easy job but can be time consuming and frustrating.
This mod was performed & supplied by Angus Ironside on his 1982 S3.
![]()
If you try this, feel free to e-mail us with your Verdict at admin@lotusespritworld.com
|
|